
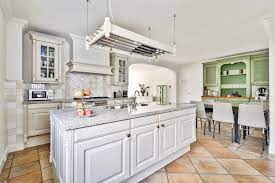
Kitchen renovations can be a daunting task, especially when considering the costs involved in hiring professionals. However, there’s a budget-friendly and creative alternative – DIY kitchen cabinet refacing. This step-by-step guide will walk you through the process, allowing you to transform your kitchen space without breaking the bank.
Benefits of DIY Cabinet Refacing
Cost Savings
One of the primary advantages of opting for a DIY approach to cabinet refacing is the significant cost savings. Hiring professionals for a complete kitchen renovation can be expensive, but refacing cabinets on your own can yield impressive results at a fraction of the cost.
Personalized Design Options
DIY cabinet refacing opens up a world of personalized design options. From choosing the type of material to selecting the perfect paint or stain color, you have the freedom to customize your cabinets to suit your unique taste and style.
Environmental Considerations
Choosing to reface cabinets instead of replacing them entirely is an environmentally friendly decision. It reduces waste and contributes to a more sustainable approach to home improvement.
Tools and Materials Needed
Before embarking on your DIY cabinet refacing journey, it’s essential to gather the necessary tools and materials. Here’s a checklist to ensure you have everything you need:
Tools:
- Screwdriver
- Paintbrushes
- Sandpaper (various grits)
- Tape measure
- Utility knife
- Jigsaw or circular saw
Materials:
- Cabinet veneer or laminate
- Adhesive
- Cabinet hardware (handles, knobs)
- Primer
- Paint or stain
Preparation Steps
To ensure a smooth and efficient cabinet refacing process, start by clearing your kitchen space. Remove any items from the cabinets and protect the surrounding areas with drop cloths or plastic sheets. Next, carefully take off the cabinet doors and hardware using a screwdriver.
Surface Cleaning and Sanding
Achieving a professional-looking finish requires a clean and smooth surface. Thoroughly clean the cabinet surfaces to remove any grease or grime. Once clean, use sandpaper to sand down the existing finish, providing a rough texture for better adhesive bonding.
Choosing the Right Refacing Material
The choice of refacing material plays a crucial role in the overall outcome. Common options include veneer, laminate, or even a combination of both. Consider the durability, maintenance requirements, and aesthetic appeal when selecting the material that suits your preferences.
Measuring and Cutting
Accurate measurements are key to a successful cabinet refacing project. Measure each cabinet surface carefully and transfer those measurements to the chosen refacing material. Use a jigsaw or circular saw to cut the material precisely along the marked lines.
Applying Adhesive and Attaching Veneer
Select an adhesive suitable for the chosen refacing material. Apply the adhesive to the cabinet surface and carefully attach the veneer, ensuring a smooth and even application. Use a roller to eliminate air bubbles and secure the veneer in place.
Adding New Hardware
Enhance the aesthetic appeal of your cabinets by upgrading the hardware. Choose handles and knobs that complement your kitchen’s style. Pay attention to uniform placement for a polished and cohesive look.
Customizing the Look
Take your DIY cabinet refacing to the next level by adding personal touches. Consider painting the cabinets in a color that complements your kitchen decor or applying a stain to showcase the natural wood grain. Incorporate decorative elements like molding or trim for added flair.
Reassembling the Cabinets
Once the adhesive has set and any additional customization is complete, it’s time to reassemble the cabinets. Attach the doors and hardware back onto the cabinets, ensuring proper alignment for a professional finish.
Final Touches and Inspections
Before declaring your project complete, attend to any final details. Clean up any excess adhesive or paint that may have accumulated during the process. Inspect the refaced cabinets closely to ensure a seamless and polished appearance.
Maintenance Tips
Now that your cabinets have undergone a stunning transformation, it’s essential to maintain their beauty. Follow these maintenance tips to ensure the longevity of your DIY refacing project:
- Clean cabinet surfaces regularly with a mild, non-abrasive cleaner.
- Avoid using harsh chemicals or abrasive materials that could damage the finish.
- Address any spills or stains promptly to prevent long-term damage.
- Inspect hardware for any signs of wear and tighten screws if necessary.
DIY Cabinet Refacing Success Stories
Still unsure if DIY cabinet refacing is right for you? Take inspiration from these real-life success stories:
-
The Budget-Friendly Makeover
-
-
- A homeowner transformed their outdated kitchen on a tight budget, achieving a high-end look with DIY cabinet refacing.
-
-
Creative Customization
-
-
- A DIY enthusiast added unique patterns and designs to their cabinet doors, showcasing the endless possibilities of personalization.
-
-
Sustainable Kitchen Upgrade
-
- An environmentally conscious homeowner embraced DIY cabinet refacing as a sustainable choice, reducing waste and contributing to a greener home.
Conclusion
Embarking on a DIY kitchen cabinet refacing project.